How to Grow Oyster Mushrooms at Home
- April 15, 2024
- 0 comment
Growing oyster mushrooms at home is a rewarding experience that doesn’t require a lot of space or a green thumb. Oyster mushrooms are known for their rapid growth and ease of cultivation, making them a favorite among mushroom enthusiasts. Here’s a comprehensive guide on how to start growing oyster mushrooms indoors, where conditions can be controlled for optimal growth.
Things You’ll Need to Grow Your Own Mushroom Are:
- Wheat straw (Wheat Straw Works Best)
- Plastic bags (Medium or Large)
- Oyster mushroom spawn (available online or from local suppliers)
- Spray bottle
- Water
Step-by-Step Guide: How to Grow Oyster Mushrooms at Home
1. Preparation
Start by making sure everything is clean, which is key to successful mushroom growing at home. First, thoroughly wash your hands with soap and water to remove any germs or dirt. This step is important because dirty hands can introduce unwanted fungi or bacteria that could harm your mushroom culture.
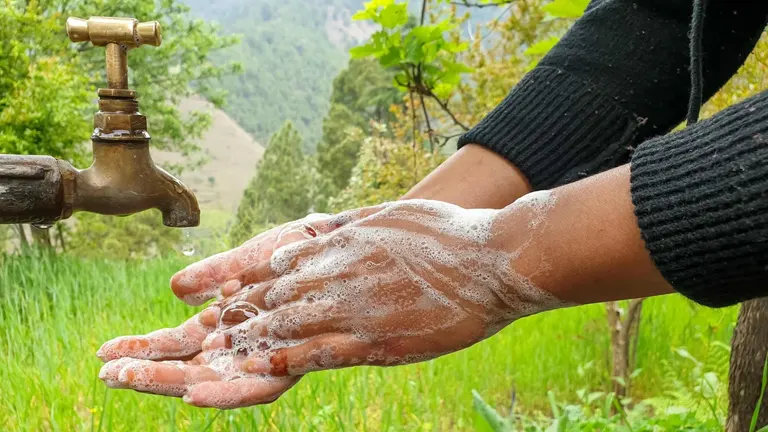
Next, clean all surfaces and tools you’ll use, such as countertops, cutting boards, and knives. You can use a disinfectant spray or a solution of bleach and water to make sure these areas are as germ-free as possible. Ensuring a clean environment helps prevent any contaminants from affecting the growth of your oyster mushrooms, setting the stage for healthy and productive growth.
2. Pasteurization
For the pasteurization step, begin by chopping your straw into small segments, roughly between 1 to 3 inches each. This size allows for better handling and more efficient pasteurization. Next, you’ll need to soak these straw pieces in water that’s been heated to between 70 and 75 degrees Celsius.
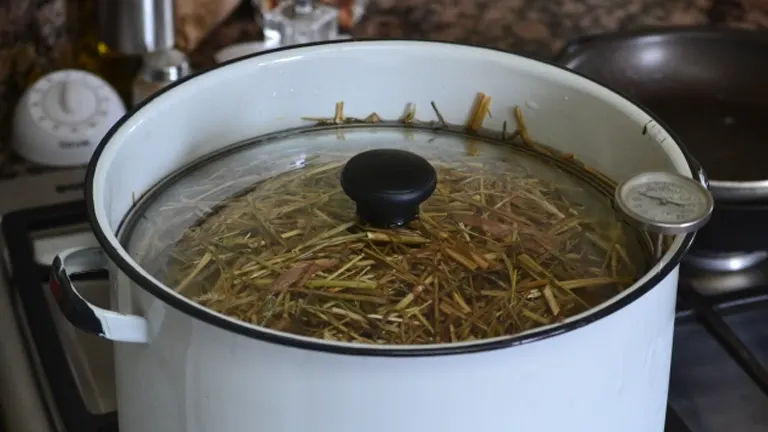
Maintain this temperature and let the straw soak for about 45 to 60 minutes. This heat treatment is crucial because it kills off any harmful bacteria and pathogens present in the straw, effectively sanitizing your growing medium before introducing the mushroom spawn. By ensuring the straw is clean and free from potential competitors, you create an ideal environment for the oyster mushrooms to thrive.
3. Cooling the Straw
Once you’ve completed the pasteurization of the straw, the next step is cooling it down to a safe temperature. Use tongs to carefully remove the straw from the hot water, placing it into a clean container. It’s vital to let the straw cool down to room temperature.
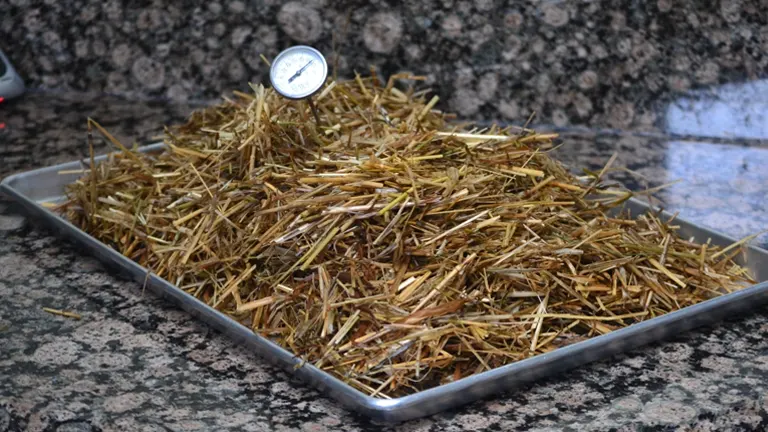
Introducing mushroom spawn to straw that’s too warm can be detrimental, as the heat might kill the delicate spawn. Patience is key here; ensure the straw isn’t just cool to the touch but has thoroughly reached room temperature. This precaution helps protect the viability of your mushroom spawn, setting the stage for successful growth.
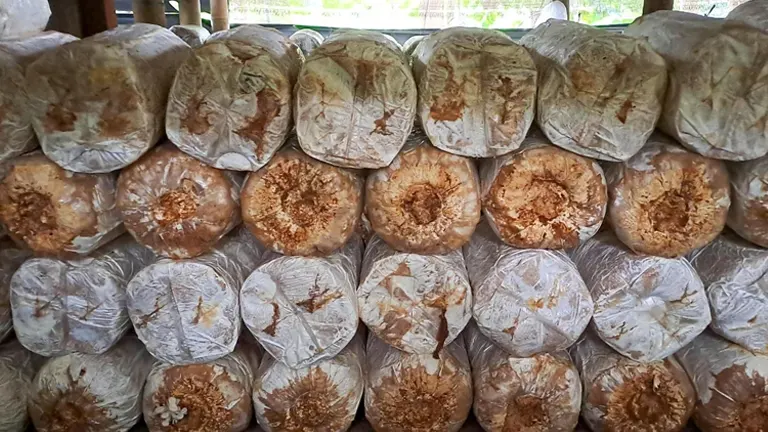
4. Bagging the Substrate
For the bagging process, start by filling your plastic bags with the cooled straw, ensuring it is tightly packed to create an optimal growing environment. As you layer the straw into the bags, evenly distribute mushroom spawn throughout.
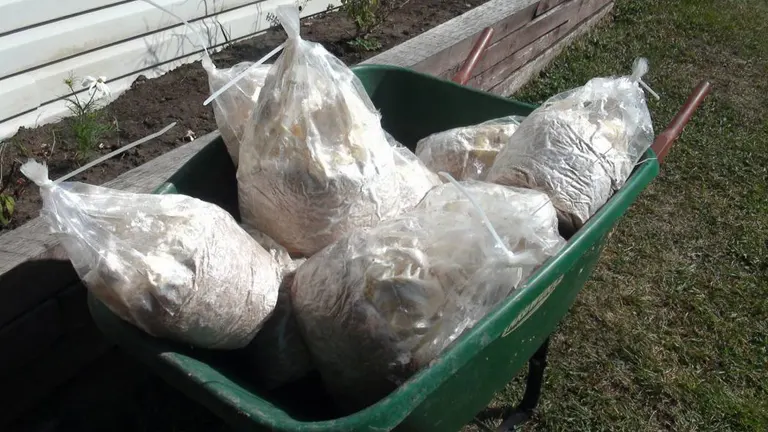
Aim to use about three to four pieces of spawn per bag. It’s crucial that the straw remains moist but not excessively wet, as an overly saturated substrate can lead to issues such as mold growth. This balance is key to fostering the right conditions for the mushroom mycelium to thrive and colonize the straw effectively.
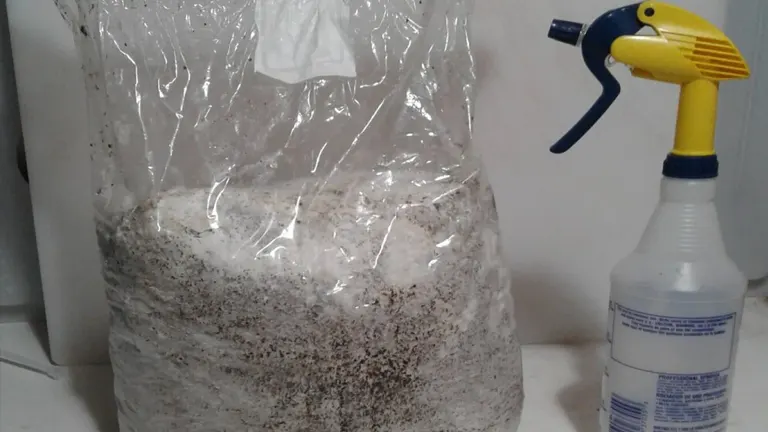
5. Air Exchange
To ensure proper air exchange, which is crucial for the growth of mushrooms, begin by sterilizing a blade, skewer, or nail. You can sterilize the tool by pouring boiling water over it. Once the tool is sterile, use it to carefully punch holes in the plastic bag every few inches. These holes will allow just enough air to support the mushroom mycelium without letting in too many contaminants.

After you’ve made the holes, seal the bags securely with a rubber band or thread. This step prevents excessive air flow that could dry out the substrate and keeps out pests and contaminants that might interfere with mushroom growth. Proper air exchange helps maintain the right balance of humidity and gas exchange, which is essential for healthy mushroom development.
6. Incubation
For the incubation stage, find a suitable location out of direct sunlight where the bags can be exposed to indirect light. The ideal temperature for incubation is between 15 to 20 degrees Celsius. During this critical phase, the mushroom spawn will start to develop into mycelium, which will appear as white, furry cobwebs enveloping the straw.
This growth indicates that the mycelium is actively colonizing the substrate, a sign of a healthy mushroom cultivation process. Keep an eye on the development over the next few weeks, ensuring that the environment remains stable to support this growth phase. Maintaining the right conditions during incubation is key to successful mushroom cultivation.
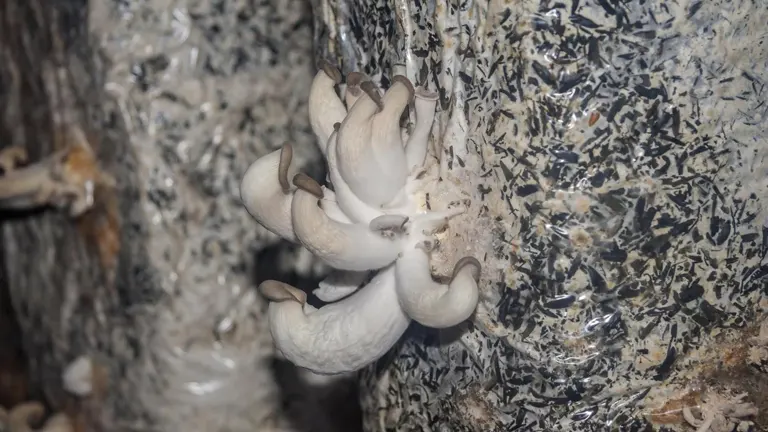
7. Monitoring Mycelium Growth
During the mycelium growth phase, it’s crucial to keep the straw in the bags moist but not waterlogged. Use a spray bottle to gently mist the straw as necessary to maintain the correct moisture levels. After approximately four weeks, you should observe that the mycelium has colonized the entire bag. This growth will look like a dense white network covering the straw, indicating healthy development.
At this point, to facilitate further growth and encourage the mushrooms to start forming, you’ll need to introduce more oxygen to the environment. This can be achieved by cutting larger holes in the bag. These holes allow for increased air exchange while still protecting the developing mycelium from external contaminants. Proper airflow is essential as it not only supports mycelium growth but also triggers the mushrooms to begin forming.
8. Fruiting
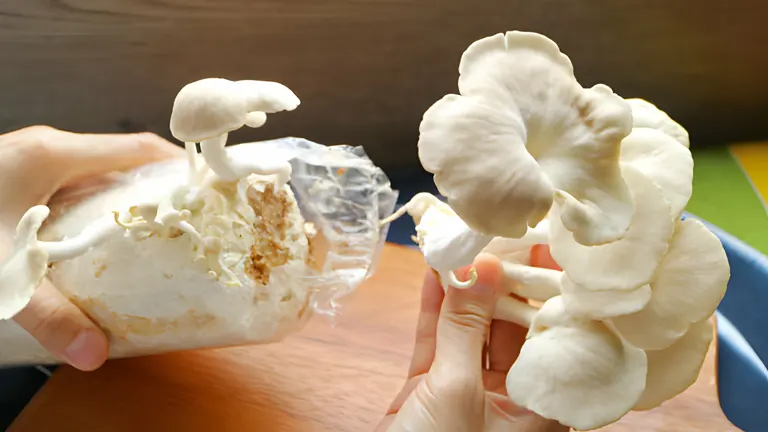
When the mycelium fully colonizes the bag and you start to see mushroom clusters emerging from the holes, it’s a sign that your setup has entered the fruiting phase. At this stage, maintaining the correct humidity is crucial for healthy mushroom growth. You should mist the developing mushrooms two to three times a day. Ensure the mushrooms are moist but not soaked, as excessive water can lead to mold growth and spoil the mushrooms.
Oyster mushrooms are known for their rapid growth rate. During this fruiting phase, you might notice that the mushrooms double in size each day. This quick expansion means that within about a week of first appearing, the mushrooms will be large enough to harvest. Keep a close eye on their development, and make sure to maintain environmental conditions to support their growth.
9. Harvesting
To harvest your oyster mushrooms, wait until the edges of the mushroom caps are still slightly curled downwards—this indicates they’re at the peak of their freshness and flavor. Carefully twist each mushroom at its base to detach it from the straw. It’s important to avoid pulling too hard, as you want to leave the base and roots intact in the straw.
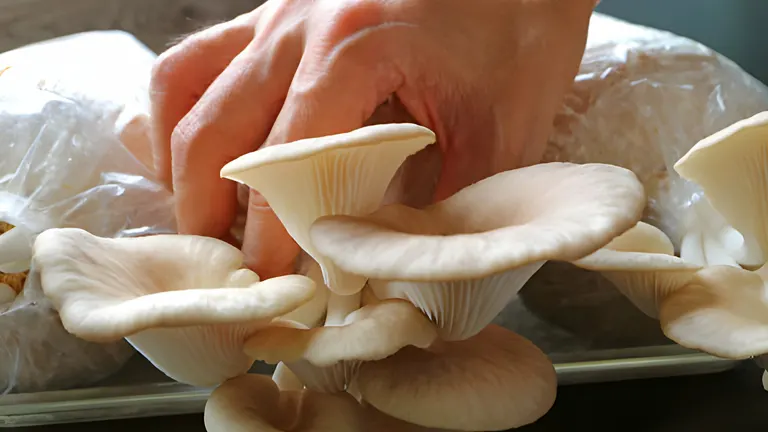
This careful removal helps preserve the mycelium still in the bag, ensuring it remains healthy and capable of producing several more flushes of mushrooms. By using this method, you maximize the yield from each batch of substrate, allowing for multiple harvests from a single setup.
10. Post-Harvest
After harvesting your oyster mushrooms, you may be able to enjoy additional flushes if the conditions remain conducive. Typically, each mushroom bag can produce between three to four flushes. Ensure that the bags continue to be kept moist and at the right temperature to encourage further growth.
Once the bags stop producing mushrooms, the spent straw still holds value. You can use it as a nutrient-rich mulch in your garden, enhancing soil health and supporting other plants. Alternatively, the straw can serve as an inoculant; simply mix portions of this spent straw into new bags filled with fresh, pasteurized straw to initiate a new cycle of mushroom growth. This recycling method not only maximizes your resources but also perpetuates your mushroom cultivation.
Troubleshooting Tips for Growing Oyster Mushrooms
- Dealing with Contamination
- Problem: Contamination is usually visible as mold or a strange color on your substrate.
- Solution: Ensure all tools, containers, and surfaces are sterilized before starting your cultivation. If contamination occurs, it’s best to discard the affected substrate to prevent it from spreading to other areas.
- Mycelium Not Spreading
- Problem: Sometimes, the mycelium may not spread or might do so very slowly.
- Solution: Check the temperature and moisture levels. Oyster mushrooms typically require temperatures between 15-24°C (59-75°F). If the substrate is too dry, lightly mist it to maintain humidity. Avoid overwatering as stagnant water can kill the mycelium.
- Overly Wet or Dry Substrate
- Problem: A substrate that is too wet can lead to mold growth, while one that’s too dry might not support mycelium growth.
- Solution: The substrate should be moist but not soggy. Squeeze a handful of substrate; if a few drops of water come out, it’s perfect. If it’s dripping, it’s too wet and needs more drainage or less frequent watering. If it’s dry, increase the misting frequency.
- Poor Mushroom Development
- Problem: Mushrooms are small, deformed, or not fruiting.
- Solution: This could be due to inadequate lighting, poor air exchange, or incorrect humidity. Ensure your growing area is well-ventilated, has indirect light, and maintains a humidity level of around 85-90%.
- Substrate Depletion
- Problem: After several harvests, the substrate might get depleted of nutrients.
- Solution: Substrate depletion is normal after multiple flushes. You can try adding small amounts of coffee grounds or soy hulls to boost nutrient levels, but eventually, the substrate will need to be replaced.
- Inconsistent Fruiting
- Problem: Mushrooms are not fruiting consistently or only fruiting in small patches.
- Solution: This might be due to uneven moisture distribution or light. Make sure the substrate is uniformly moist and exposed to consistent, indirect light.
- Mushrooms Growing in Odd Places
- Problem: Mushrooms might start popping out from unexpected parts of the substrate bag.
- Solution: This is usually harmless but indicates that your mushrooms are finding it easier to grow through those spots. Ensure even air exchange and light distribution to encourage fruiting at the intended sites.
Table 1: Nutritional Content of Oyster Mushrooms (90 grams)
| Nutrient | Amount |
|---|---|
| Calories | 30 |
| Carbohydrates | 5g |
| Protein | 3g |
| Dietary Fiber | 2g |
| Vitamin D | 3% of DV |
| Sugar | 1g |
| Gluten, Fat, Cholesterol | None |
Table 2: Vitamin and Mineral Content of Oyster Mushrooms
| Vitamin & Mineral | Amount (% DV) |
|---|---|
| Niacin | 28% |
| Copper | 25% |
| Riboflavin | 24% |
| Pantothenic Acid | 23% |
| Folate | 9% |
| Potassium | 8% |
| Iron | 7% |
Additional Nutrients Present:
- Zinc
- Calcium
- Phosphorus
- Vitamin C
- Folic Acid
- Niacin
- Vitamins B1 (Thiamine) and B2 (Riboflavin)
8 Oyster Mushroom Health Benefits
- Oyster mushrooms are remarkably low in calories, with only 30 calories per 90 grams, making them an ideal food for weight management. Despite their low caloric content, they are rich in vital nutrients, including proteins, fibers, vitamins, and minerals, which help to meet your daily nutritional requirements without adding extra pounds.
- Oyster mushrooms contain no cholesterol, fat, or gluten, which are beneficial for cardiovascular health. They are high in potassium and low in sodium, which helps to regulate blood pressure and reduce the risk of hypertension. The presence of fibers helps to lower cholesterol levels by binding with cholesterol particles and removing them from the body.
- These mushrooms are a good source of antioxidants like selenium and vitamin C, which help to reduce oxidative stress in your body. Antioxidants protect against chronic diseases by neutralizing free radicals that can cause cellular damage and inflammation.
- The high levels of selenium in oyster mushrooms not only aid antioxidant activity but also enhance immune function. This mineral is crucial for the development and management of immune system cells, thereby improving the body’s ability to fight off illness.
- The natural fibers in oyster mushrooms can help manage diabetes by slowing down the digestion process, which prevents spikes in blood sugar levels after meals. This makes them an excellent dietary choice for people managing their blood sugar levels.
- Oyster mushrooms are one of the few food sources rich in niacin (vitamin B3) which is vital for the healthy functioning of the brain and could be linked to a lower risk of Alzheimer’s disease. Niacin also helps to reduce psychological stress and works as a memory booster.
- They offer an array of minerals necessary for bone health, including iron, calcium, and phosphorus. These contribute to strengthening bone density and preventing conditions such as osteoporosis.
- Rich in B vitamins such as riboflavin, niacin, and pantothenic acid, oyster mushrooms help in energy production and the formation of red blood cells, which carry oxygen throughout the body, enhancing metabolic processes and overall energy levels.
Conclusion
Growing oyster mushrooms at home is not just about producing a delicious crop; it’s about experiencing the joy of cultivation and the satisfaction of self-sufficiency. Whether you’re a seasoned gardener or a curious novice, the process of growing mushrooms offers a unique glimpse into the fascinating world of fungi.
More Articles You Might Enjoy:
- 15 Poisonous Mushrooms Foragers Need to Know
- 15 Edible Wild Mushrooms for Foraging Enthusiasts
- How to Identify Edible Wild Mushrooms: A Beginner’s Guide
- 6 Essential Steps for Successful Mushroom Farming
- Top 5 Remarkable Health Benefits of Mushrooms
- Top 7 Popular Mushrooms to Grow
FAQs
- Why are oyster mushrooms unique?
Oyster mushrooms are highly valued for their antioxidant content, which surpasses many other types of cultivated mushrooms. This nutritional benefit makes them a popular choice for dietary supplements. They are also rich in ergothioneine, an important amino acid. - How can you best enjoy oyster mushrooms?
Oyster mushrooms are versatile and can be enjoyed in various dishes. They work well in stir-fries, pastas, risottos, as side dishes, or atop toast. Due to their silky texture when cooked, they are excellent for braising and add depth to soups, stews, and sauces. - Do you need to cook oyster mushrooms before eating?
Golden oyster mushrooms are unique in that they can be consumed raw, thanks to their crisp texture and nutty flavor that intensifies when cooked. Other varieties are generally cooked to enhance their flavor and texture. - Can oyster mushrooms be cultivated in the Philippines?
Yes, the Philippines cultivates a variety of edible and medicinal mushrooms, including oyster mushrooms, along with other types such as Shiitake, Button, and Reishi mushrooms. - Are oyster mushrooms good for people with high uric acid levels?
Oyster mushrooms contain purines, which the body breaks down into uric acid. They help regulate uric acid levels, which is beneficial for individuals managing conditions like gout. - Is it safe to eat oyster mushrooms daily?
Eating about 20-30 grams of oyster mushrooms daily or every other day can help reduce blood sugar levels, which is particularly beneficial for individuals with hyperglycemia or type 2 diabetes. - How long can you store oyster mushrooms?
Oyster mushrooms can be stored in the refrigerator for at least three days. They have a meaty texture and mild flavor and require minimal cooking time, retaining their size and texture when cooked. - Why are they named oyster mushrooms?
Named for their oyster-like shape, these mushrooms are carnivorous and have a slight aniseed smell. They are a common sight in UK woodlands and are known for their large, fan-shaped caps. - Are oyster mushrooms considered a superfood?
Yes, oyster mushrooms are considered a superfood due to their rich content of fiber, protein, vitamin B, and antioxidants. These nutrients contribute to heart health, regulate blood sugar, and boost immunity. - What is the local name for oyster mushrooms in India?
In India, oyster mushrooms are commonly known as ‘dhingri’. They naturally grow in temperate and tropical forests on decaying wooden logs or trunks. - Can you freeze oyster mushrooms?
Yes, oyster mushrooms can be frozen and tend to freeze well due to their firm and meaty texture. Ensure they are clean and sliced before freezing to preserve their quality and ease of use later.
We hope you found this guide on growing oyster mushrooms at home helpful! If you try it out or have any tips of your own, please share your experiences in the comments below. We’d love to hear how it goes for you and any insights you might have. Happy mushrooming!

Charles Hayes
Forestry AuthorI'm Charles Hayes, I bring over 15 years of specialized expertise in landscaping and woodworking, blending artistic design with sustainable environmental stewardship. My career, fueled by a profound passion for the natural world, encompasses extensive education and hands-on experience in creating harmonious, eco-friendly outdoor spaces and responsibly managing forest resources. Recognized for my professional standing, I am committed to continuous learning and certification in cutting-edge practices. My expertise is not only reflected in my work but also in my contributions to community projects, educational workshops, and collaborations with industry leaders. As an authoritative voice in my field, I strive to share knowledge and promote environmentally conscious approaches, making me a trusted resource in landscaping and forestry.


Leave your comment